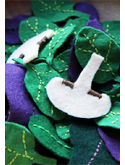
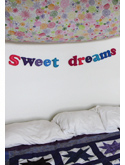
Sweet Dreams Felt Banner

I wanted to personalize our daughter’s room with all different types of artwork, not strictly the photos and paintings typically found in bedrooms. From the beginning I knew that some sort of 3D felt embroidery projects would be involved, as at the moment that is my favorite creative medium.

When I saw these fantastic felt letters last fall I knew I had found the perfect special project.


Being the rebel that I am I couldn’t do our daughter’s name. Instead I wanted to do something to create or inspire. I first made a “create” sign for over her desk (you’ll see a photo of that soon) and then set about making “dream” for over the bed.

When I finished “dream” I realized that it was WAY too small for such a large space as over her bed. So “dream” quickly became “sweet dreams” and I couldn’t be more pleased with the outcome.

If you too want to do this project, read Made By Rae’s Felt Letter’s post for directions.
Here are my deviations from her project directions, plus some additional helpful tips:
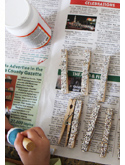
1) I used a 500 pt font (instead of the 400 pt that Rae used) for our letters; next time I may go even bigger.
2) When I printed out the letters I formatted them as “outline only” so as not to waste lots of printer ink (thanks to my friend Alissa for this great tip!). I also used heavy-weight card-stock instead of regular printer paper.
3) I then cut out each letter, pinned each letter outline on top of two layers of felt (to cut both the front and back sides of each letter at once), then cut out around the paper outline. (This way I skipped the time-consuming letter tracing step before cutting out the felt letters.)
4) I used embroidery floss instead of plain thread in bright, often contrasting colors (first I matched the embroidery floss colors to that of the felt, then I mixed up which letter got which color). I like the chunky look for the whipstich that resulted.
5) Be forewarned that this project is time consuming. Each letter took me between 30-45 minutes. Granted I was chatting with friends while I worked, so it may have been much faster had I just focused on the task at hand. I personally prefer having company while working on craft projects. Makes the time go so much faster, don’t you think?!
Have fun and good luck!
5 Comments
RSS feed for comments on this post.
Sorry, the comment form is closed at this time.


it looks so great!
having friends with me is CRUCIAL for anything crafty. which is why i haven’t done anything crafty in so long… :)
Comment by Alice — March 1, 2011
Love it!! How did you hang it on the wall?
Comment by Mom — March 1, 2011
There is something about those letters that I love (and feel I have to try sometime!). Looks fantastic!
Comment by Alexis — March 1, 2011
Ooh, looks fantastic!
Comment by Lisa — March 1, 2011
[…] I wanted to embroider something special to hang with the “create” felt banner I made for above the desk in our daughter’s new big girl room (similar to the “sweet dreams” felt banner above her bed). […]
Pingback by Out and About with the Spritzer Leyba Family » Embroidered Portrait Fun — March 9, 2011